

My family and I just recently got back from a trip to South Lake Tahoe for a dear friends beautiful wedding. After two flights and screaming children (Yes, we were the most hated passengers on the plane!) all we could think about was food...Glorious food!
I'm sure most of you have flown. If not, do not eat airport food. It really is awful. I attempted to eat a caesar salad....safe, right? No, not so safe. After 2 bites down it went into the garbage.
Immediately when we received our rental car we asked for the nearest healthy, good restaurant or deli. They pointed us to a place called süp (Pronounced:soup). It's small quaint place that serves great sandwiches, salads and soups (no they didn't sponsor this post. I just really liked it!)
I bought our 16 month old a baked potato soup (playing it on the safe side, since she's a picky eater) and we all fought for spoonfuls. I knew this was a soup I would try to recreate when I got home.

I would definitely say this soup is comparable or even slightly better (yes, I'm biased.) ;-)
It tastes exactly like a loaded delicious baked potato. My soup is a thicker soup but it's easy to thin it out with adding extra milk or chicken broth.

Now, comes the good part...the giveaway!
This giveaway isn't sponsored (although I do have a fun sponsored giveaway coming up soon!) I recently bought a few items for myself and I love them and wanted to share it with all my wonderful readers/friends!
One of my favorite stores for home and clothes is anthropologie!
A few weeks ago I found some adorable ceramic 'cartons'. I use them for fruit and planted flowers, but they can really be used for anything, and they are great photo props!


This ceramic rolling pin is the best and most efficient rolling pin I've ever used. Virtually no sticking, and it's adorable!

Giveaway Details
You have until Wednesday, Oct 5th, 12 midnight PST to enter this giveaway. One winner will be chosen via random.org and will have 2 days to respond or a new winner will be selected. Only open to residents of the US and Canada.
Items:
1 white ceramic (dishwasher safe & microwave safe) 'carton'
1 teal ceramic (dishwasher safe & microwave safe) 'carton'
1 ceramic rolling pin
How to Enter:
5 possible entries. To earn credit for each entry leave separate comments for each step (listed below) on my blog. If you don't leave a separate comment for each step, I will not be able to include them.
YOU MUST leave your email, in order for me to contact you.
1. "Like" Epicurean Mom on Facebook
3. Follow @EpicureanMom on Twitter
5. Tweet this post/giveaway, being sure to include my twitter handle (@EpicureanMom.)
4. Stumble this post
5. Leave a comment about your favorite/most used kitchen item (mine being this amazing roller!)
Good Luck!!
*Come join SoupaPalooza at TidyMom and Dine and Dish sponsored by KitchenAid, Red Star Yeast and Le Creuset. *
*Come join SoupaPalooza at TidyMom and Dine and Dish sponsored by KitchenAid, Red Star Yeast and Le Creuset. *
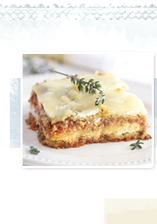
Loaded Baked Potato Soup
Recipe Adapted from Epicurean Mom
Serves 6
Ingredients:
3-4 Large Russet Potatoes
2 tablespoons olive oil
1/2 cup butter (1 stick)
3/4 cup flour
2 1/2 cups broth
1/2 cup half & half
2 1/2 cups 2% milk
1/4 teaspoon pepper
1 1/4 teaspoon salt
1 teaspoon minced garlic
1 cup (mild) cheddar cheese, grated, plus more for garnish
1 cup white (mild) cheddar cheese, grated
1/2 cup sour cream
1 large onion, diced
5 pieces bacon, cooked and crumbled
4 tablespoons chives, chopped
Preparation:
Pre-heat oven to 400 degrees. Rub potatoes with olive oil and place on a baking sheet. Bake for 45 min- 1 hour, or until soft and completely cooked.
Cool potatoes completely and peel. Dice 2 potatoes (into bite sized pieces) and mash the other with 1/2 cup milk. Separately, set both aside.
Over medium heat melt butter (you can add more butter, I cut on it to save on calories) in a dutch oven and add flour, stirring vigorously, until thickened and smooth. Slowly add half and half and milk (stirring vigorously.) Add onions and garlic and cook until soft and translucent (stirring continuously.) Add the mashed potato. Using an emulsion blender or blender, blend until smooth (if using a blender return to the dutch oven.) Add chicken broth, cheddar cheese and white cheddar cheese, salt and pepper.
Stir in the sour cream, until completely incorporated, and add diced potatoes.
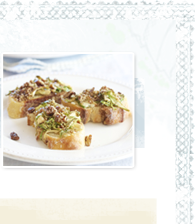
Spoon into bowls and garnish with cheddar cheese, bacon and chives.


 Hi!! I'm Katie and welcome to my blog, Epicurean Mom! There are two things I love most in life; family and food ~ usually in that order. This blog is dedicated to both. My love of food started when I was young helping my mom in the kitchen. Now it's my turn to teach my daughters to experiment and enjoy the process of coming up with culinary creations of their own.


