Moving
*Ugh* Is all I have to say! We have been moving for the past 2 days, with no end in sight! Hopefully we will get settled very soon. Once we do I have a yummy popsicle recipe to share with you!

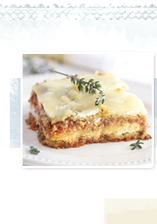
Farmers' Market Pizza

I found myself wandering around the Farmers' Market grabbing every veggie that looked delicious, which was pretty much all of them. My girls have a pretty broad palette, but not enough to eat veggies every night for a week.

Often I've been conflicted on how to incorporate fresh veggies with fun dishes for the girls. Either, it seems, there's too much spice or it's too bland.

Is there a happy medium?? I think I may have found one....

How can I incorporate all of these veggies in one dish that the girls would happily eat? Pizza, you say? Absolutely! Pizza is a universal kid magnet. It seems you can 'dump' all the veggies onto a warm, delicious, cheesy, comfort food bread and the kids will eat it up.
Brilliant, I say!

Farmers' Market Pizza
Recipe Adapted From Epicurean Mom
Serves 4-6
For Dough:
I, personally, use a pre-made dough from an organic grocery store (Lazy Acres). I'd rather spend the time making pizza sauce rather than the dough. If you have time to make both...great!!
For Sauce:
(makes sauce for 2-pizzas)
26 ounces strained tomatoes (I use Pomi)
1 teaspoon salt
1/4 teaspoon red pepper flakes
1 teaspoon dried basil
1/2 teaspoon dried parsley
1/8 teaspoon dried cumin
1/4 teaspoon dried oregano
1/4 teaspoon granulated garlic
1/2 teaspoon fresh minced garlic
1/8 teaspoon thyme
1/8 teaspoon fresh ground pepper
1 tablespoon fresh rated parmesan
1/2 teaspoon onion powder
1 bay leaf
Preparation:
Combine all ingredients in a medium non-stick skillet. Bring to a boil and simmer for about 10 minutes, stirring frequently. Set aside to cool. Be sure to remove bay leaf.
For Pizza Topping:
1/4 cup olive oil
3/4 cup fontina cheese, grated
1 cup mozzarella cheese (grated) plus a few round slices
A handful of parmesan cheese, shaved
2 kale leaves, shredded
1 purple bell pepper, slivered
1/2 red onion, chopped
1 ear of white corn, shaved off the ear
1 costata romanesco zucchini, cut in rounds ( Less moist then more common italian zucchini and very nutty)
1 roma tomato, cut into 1/4-inch pieces
Preparation For Pizza:
Preheat oven to 425 degrees.
Brush pizza crust with olive oil. Spread 1/2 of the pizza sauce on top, a handful of the parmesan cheese, grated mozzarella and grated fontina cheese. Sprinkle the rest of the ingredients over the cheese and top with the mozzarella rounds.
Bake for about 15-20 minutes, or until golden brown color.
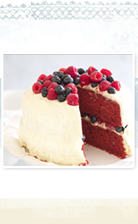
Black Forest Cake {Guest Feature}

First I feel I need to give a big thank you to all the bloggers that inspire me... Cannelle et Vanille, What Katie Ate, Tartelette, among many others. Without all of these fabulous blogs mine would not be what it is. I love that fellow mom bloggers and non mom bloggers are be able to share their lives, kids and family. We all have a common interest... food, writing and photography.

I remember growing up and my dad would be hidden away in his dark room developing pictures. My sister and I developed our passionate love for photography from him. How cool is it that we live in the technology era and we have semi professional cameras that are user friendly?! In the 80's photography was anything but user friendly. My dad was not only a successful career man but also an extremely successful photographer.

Generally the food blogging community is supportive and helpful. I can't tell you how many bloggers I've emailed about lighting, camera, food styling issues and all have emailed with tips and incredible support. I'm so thankful to be apart of the blogging community. There's something to be said for writing your thoughts, ideas and heart down for others to read. It's as if you're laying on a long couch privately sharing your inner feelings in a private session.

Now, I bet you're wondering about these gorgeous crowns on my cake?? A friend, who is a photographer and designer, make these crowned embellishments for baby photography, food styling, home decor or whatever may suit your interest. When she went live with them I quickly ordered some for styling foods.

Black Forest Cherry Cake
Cake base adapted from Martha Stewart's chocolate cake (makes one 8-in 2 layer cake)
Frosting adapted from What Katie Ate
For cake:
Ingredients
1 1/2 cups unsweetened cocoa powder
1 1/2 teaspoons salt
3 cups all-purpose flour
1 tablespoon baking soda
1 1/2 teaspoons baking powder
3/4 cup vegetable oil
1 1/2 cups buttermilk
3 cups sugar
1 1/2 teaspoons vanilla extract
3 large eggs, lightly beaten
1 1/2 cups hot water
I added:
1/3 cup chopped morello cherries
1 22 ounce sour cherry jam
Preparation:
Preheat oven to 350 degrees. Butter 2 8-in non-stick cake pans.
Sift cocoa, flour, baking powder, baking soda, salt and sugar into bowl. Beat in oil, vanilla, buttermilk, eggs, chopped cherries, 1 tablespoon jam and hot water one at a time, using a mixer on low. Beat until smooth, about 4 minutes.
Pour batter into prepared cake pans and bake for about 40 minutes, or until a toothpick inserted in the middle comes out clean. Let cool completely and cut off very top layer of cakes.
Once cool slather jam on top of one of the cakes and carefully place the other on top.
For Frosting:
Ingredients
170 grams good 70% chocolate
1 1/4 cups unsalted butter, room temperature
11/4 cups caster (superfine) sugar, sifted
1 tsp vanilla extract
Preparation:
In a bowl beat the butter and sugar until smooth and creamy. In a double boiler melt the chocolate, until just melted, be very careful to not burn the chocolate.
Add the vanilla to the chocolate, let cool slightly. Add to the butter mixture and beat until well incorporated.
Using an icing spatula slather icing onto cake and decorate with a smooth look or a rustic messy look. I love a rustic looking cake!
White Peach and Spearmint Sorbet

A week ago I was wandering around the Farmers' Market and found the most amazing gerber daisy's. They have a beautiful light pink color in the middle with a fading white to pink petals. They are simply amazing...

They are still as beautiful as the day I bought them. Yes, 7 days later!! Yesterday I rushed back to buy some more and expectedly found myself perusing with a sleepy baby tossed over my shoulder dodging baby gawkers.

Have you walked with a baby, a sleeping baby at that? Every 2 ft I would hear "Oh honey! It's a baby and she's sleeping!! Do you see? How precious!" Politely I would smile hoping they wouldn't want to stop and talk.
It's not that I'm anti-social, quite the opposite actually, it's just very challenging to rush and get your errands done all the while a 20lb infant is glued to your shoulder/arm. I stagger, attempt to carry everything quietly and effortlessly without waking the baby as people are ohhh'ing and ahhh'ing inevitably waking the babe.

Although in the midst of all the chaos it is semi comforting to see people look, love and adore your child. One very sweet vendor said "How lucky are you? You get to start from the very beginning, yet remember all the memories." This thought, crazily, has never entered my mind. How right is she??
Often it's times like this that makes you slow down and appreciate those insanely busy yet short moments.

Just when I thought I couldn't carry anything more I walked past the most delicious looking white peaches. The vendor sweetly gave me a mouthwatering bite, I was in love! I automatically grabbed a few pounds and went on my way.
What was I going to do with a few pounds of peaches?? Our family adores them but to gobble all of them up before they go bad, not too likely.

I was planning on making my husbands favorite raspberry sorbet...what about white peach sorbet? This got me thinking about ingredients. There is something to be said for simple and basic recipes. I threw 4 ingredients together and voila, absolutely delicious and refreshing sorbet!

White Peach and Spearmint Sorbet
Recipe adapted from Epicurean Mom
Serves 3-4
Ingredients:
1 1/2 pounds white peaches, peeled
1 teaspoon spearmint, minced
1 cup water
3/4 cup granulated sugar
Preparation:
Combine water and sugar in a medium saucepan. Bring to a boil and simmer for 5 minutes, stirring occasionally. Remove from heat and let cool completely.
In a blender blend the white peaches and spearmint until well blended and smooth. Refrigerate for at least 30 minutes or until well chilled.
Once all ingredients are cool combine the peach mixture with the sugar syrup, stirring until well blended. Pour the mixture into the bowl of an ice cream maker and use according to manufactures instructions.
Serve with sliced peaches and raspberries (or any of your favorite fruits)
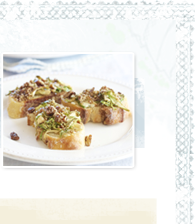
Stuffed Mozzarella Squash Blossoms with Rosemary Radishes and Baby Carrots

What a great end to the week. My sister, who lives in Northern Ca, came down to visit on a last minute whim. I rarely get to visit with her since we are both inundated with life; me family, her work. We were invited to a beautiful wedding at the Figueroa Mountain Farmhouse on Saturday (this historic site is one of the many amazing sites you need to see next time you visit Southern Ca) and on Sunday we brunched and caught up. There's something to be said for sisterly visits... slightly therapeutic.

Before my sister's arrival we took our weekly visit to the Farmers' Market on Saturday. I love the Farmers' Market; lots of music, little kids dancing, balloons, great produce and wonderful people to mingle with. Both my girls have an amazing time devouring their freshly picked fruits and veggies as they're swaying back and forth meeting new friends.

Exploring all the wonderful foods, taking in the surroundings and experiencing the diverse culture makes my heart go pitter patter. Walking around the Farmers' Market influences and inspires me to create and make things that the grocery store would never usually do.

As we danced our way through the crowds of the Market, I quickly glanced upon a beautiful bouquet of squash blossoms. Squash blossoms are phenomenal when stuffed and fried. Not the healthiest but definitely the tastiest!

And radishes... well, I've never been a big radish fan; usually they are uncooked and served with a salad. My mom, being a true southern belle, has always loved radishes. She remembers them being served raw and dipping them in salt, which she loves. Since I've made my roasted radishes, she's become a true fan, to be honest so have I!


Farmers' Market: Stuffed Mozzarella Squash Blossoms with Rosemary Radishes and Baby Carrots
Recipe Adapted from Epicurean Mom
Servings 4-5
Ingredients:
Bundle of radishes
Bundle of baby carrots
12 squash blossoms, stamen removed
3-4 sprigs rosemary
2 tablespoons garlic infused olive oil
8 oz mozzarella, grated
1 cup flour
2 eggs
Vegetable oil
1 tablespoons sea salt plus more for garnishing
1/2 tablespoon pepper
Preparation:
Wash squash blossoms, radishes and carrots. Place the radishes and carrots aside. Very gently take the stamen out from inside the blossom. Pat dry and carefully fill the blossoms with mozzarella cheese, twist the top of the blossoms to close off, repeat with remaining.
Place the flour into a shallow bowl and add the pepper and salt, mix until well incorporated. Beat the eggs in a bowl and place next to the flour (like an assembly line.) Dredge the squash blossoms in flour mixture (do not tap off excess), then in the egg wash and back in the flour, until very well coated. Repeat with remaining blossoms.
Preheat the oven to 400 degrees. Place the radishes in a cast iron skillet drizzle olive oil on the radishes until well coated and sprinkle a few sprigs of rosemary on top. Repeat this process with the baby carrots on a baking sheet and bake until just browned, about 20-25 minutes. Sprinkle the blossoms with sea salt.
Pour oil into a tall rimmed frying pan, filling about 2-3 inches. Heat until hot but not smoking, about 350-380 degrees. Carefully fry blossoms in batches, until a nice golden brown color. Serve warm.
Subscribe to:
Posts (Atom)
 Hi!! I'm Katie and welcome to my blog, Epicurean Mom! There are two things I love most in life; family and food ~ usually in that order. This blog is dedicated to both. My love of food started when I was young helping my mom in the kitchen. Now it's my turn to teach my daughters to experiment and enjoy the process of coming up with culinary creations of their own.


